Tag: rte-source |
(Adding categories) |
||
| (9 intermediate revisions by the same user not shown) | |||
| Line 1: | Line 1: | ||
{{for|the [[NSDF]] [[Luna]]r base|Eagle's Nest One}} |
{{for|the [[NSDF]] [[Luna]]r base|Eagle's Nest One}} |
||
| − | <blockquote class="templatequote">''"We underestimated the Soviet strength, and we underestimated their committment to controlling the bio-metal. Now their intentions are clear. If it's a war they want, then it's a war they shall get |
+ | <blockquote class="templatequote">''"We underestimated the Soviet strength, and we underestimated their committment to controlling the bio-metal. Now their intentions are clear. If it's a war they want, then it's a war they shall get!"''<br />- [[General Collins]]</blockquote> |
{| class="infobox" style="float:right; width: 25em; text-align: left; font-size: 90%" cellspacing="0" |
{| class="infobox" style="float:right; width: 25em; text-align: left; font-size: 90%" cellspacing="0" |
||
| − | |+ style="background-color: #3e4855; font-size: 140%;"|<span style="color: #ffffff;">'''Eagle's Nest |
+ | |+ style="background-color: #3e4855; font-size: 140%;"|<span style="color: #ffffff;">'''Eagle's Nest 1'''</span> |
|- |
|- |
||
|colspan="0" style=" text-align:center;"|[[Image:Misn03_shell.png|center|300px]] |
|colspan="0" style=" text-align:center;"|[[Image:Misn03_shell.png|center|300px]] |
||
| Line 42: | Line 42: | ||
|} |
|} |
||
| − | '''Eagle's Nest One''' is the second mission of [[Stars and Stripes]], and the last mission of [[Battlezone]] to be set on [[Luna|the moon]]. It is also the last mission in the [[Battlezone Demo]]. It shows the [[CCA]]'s final assault on [[Eagle's Nest One]], the event which forced the [[NSDF]] to retreat to [[Mars]]. |
+ | '''Eagle's Nest One''' is the second mission of [[Stars and Stripes]], and the last mission of [[Battlezone (1998)|Battlezone]] to be set on [[Luna|the moon]]. It is also the last mission in the [[Battlezone Demo]]. It shows the [[CCA]]'s final assault on [[Eagle's Nest One]], the event which forced the [[NSDF]] to retreat to [[Mars]]. |
== Details == |
== Details == |
||
| Line 49: | Line 49: | ||
=== Synopsis === |
=== Synopsis === |
||
[[File:Misn03_eaglesnest.png|thumb|left|120px|[[Eagle's Nest One]]]] |
[[File:Misn03_eaglesnest.png|thumb|left|120px|[[Eagle's Nest One]]]] |
||
| − | Bates is deployed to Eagle's Nest One just after the Soviet attack was repelled. [[George Collins|General Collins]] informs him that the base survived, but was rendered defenseless - and a second attack from the south-east, aiming to destroy the [[Command Tower (NSDF)|Command Tower]] and [[Solar Power Plant (NSDF)|Solar Arrays]], is already underway. With no other combat units nearby Bates is forced to fight them off alone, after which the [[Montana]] is deployed in order to help restart the base's defenses. |
+ | With no time even to bury the dead, the NSDF is immediately on the defensive. Bates is deployed to Eagle's Nest One just after the Soviet attack was repelled. [[George Collins|General Collins]] informs him that the base survived, but was rendered defenseless - and a second attack from the south-east, aiming to destroy the [[Command Tower (NSDF)|Command Tower]] and [[Solar Power Plant (NSDF)|Solar Arrays]], is already underway. With no other combat units nearby Bates is forced to fight them off alone, after which the [[Montana]] is deployed in order to help restart the base's defenses. |
[[File:Misn03_wave1.png|thumb|left|120px|The first wave of assailants]] |
[[File:Misn03_wave1.png|thumb|left|120px|The first wave of assailants]] |
||
| Line 67: | Line 67: | ||
:{{N64}} In the Nintendo 64 version you will start with enough resources to build two Badgers instead of the usual one. |
:{{N64}} In the Nintendo 64 version you will start with enough resources to build two Badgers instead of the usual one. |
||
| − | [[File:Misn03_paks.png|thumb| |
+ | [[File:Misn03_paks.png|thumb|right|120px|The four Paks will cause trouble later if not removed]] |
You'll need at least one turret between the ridge and the command tower in order to draw fire and protect the tower. Fortunately you have more than ample time after the first attack wave and will be able to get two built by the time the first attack wave shows up. You may also wish to use this time to destroy the four [[Pak]]s waiting in the crater to the east - they'll provide a nice scrap bonus and even if your Scavengers don't get snared by them they will only get in the way of your escort duties later. You can use your [[Manual Detonation Mortar]] to take them out from the other side of the hill - you only need three direct hits to take each out, but if you run low on ammo there's a [[Supply Depot (NSDF)|Supply Depot]] just west of the Command Tower. If they manage to cause any significant damage, there's a [[Hangar (NSDF)|Hangar]] just north of that. |
You'll need at least one turret between the ridge and the command tower in order to draw fire and protect the tower. Fortunately you have more than ample time after the first attack wave and will be able to get two built by the time the first attack wave shows up. You may also wish to use this time to destroy the four [[Pak]]s waiting in the crater to the east - they'll provide a nice scrap bonus and even if your Scavengers don't get snared by them they will only get in the way of your escort duties later. You can use your [[Manual Detonation Mortar]] to take them out from the other side of the hill - you only need three direct hits to take each out, but if you run low on ammo there's a [[Supply Depot (NSDF)|Supply Depot]] just west of the Command Tower. If they manage to cause any significant damage, there's a [[Hangar (NSDF)|Hangar]] just north of that. |
||
| Line 82: | Line 82: | ||
== Trivia == |
== Trivia == |
||
| − | [[File:Misn03_barracks.png|thumb| |
+ | [[File:Misn03_barracks.png|thumb|right|120px|The lone Soviet barracks]] |
*A CCA [[Barracks (CCA)|Barracks]] is placed in the map's south-eastern corner. Its only purpose is to prevent ejected Soviet pilots from standing idly. |
*A CCA [[Barracks (CCA)|Barracks]] is placed in the map's south-eastern corner. Its only purpose is to prevent ejected Soviet pilots from standing idly. |
||
**{{N64}} In [[Battlezone: Rise of the Black Dogs]] downed pilots will not return to it, despite its presence. |
**{{N64}} In [[Battlezone: Rise of the Black Dogs]] downed pilots will not return to it, despite its presence. |
||
*The massive CCA assault force Collins describes as attacking from the north-west is actually spawned to the south in the cutscene. The waves of Czars and Flankers that attack the transports also come from this direction. |
*The massive CCA assault force Collins describes as attacking from the north-west is actually spawned to the south in the cutscene. The waves of Czars and Flankers that attack the transports also come from this direction. |
||
| + | *In contrast to the general standard, losing the Recycler during this mission does not automatically result in a mission failure. |
||
== Gallery == |
== Gallery == |
||
| Line 104: | Line 105: | ||
== Appearances == |
== Appearances == |
||
*[[Battlezone Demo]] {{first}} |
*[[Battlezone Demo]] {{first}} |
||
| − | *[[Battlezone]] |
+ | *[[Battlezone (1998)|Battlezone]] |
*[[Battlezone: Rise of the Black Dogs]] |
*[[Battlezone: Rise of the Black Dogs]] |
||
| − | *[[DLL Source]] |
+ | *[[DLL Source Pack]] |
{{StarsandStripesNav}} |
{{StarsandStripesNav}} |
||
| Line 113: | Line 114: | ||
<references/> |
<references/> |
||
[[Category:Stars and Stripes]] |
[[Category:Stars and Stripes]] |
||
| + | [[Category:Featured Articles]] |
||
| + | [[Category:Articles with broken maps]] |
||
Latest revision as of 14:27, 29 June 2020
- For the NSDF Lunar base, see Eagle's Nest One.
"We underestimated the Soviet strength, and we underestimated their committment to controlling the bio-metal. Now their intentions are clear. If it's a war they want, then it's a war they shall get!"
- General Collins
 |
| Information |
|---|
| Name: Eagle's Nest One |
| World: Luna |
| Campaign: Stars and Stripes |
| Details |
| Faction: NSDF |
| Enemy: CCA |
| Scrap: 20 |
| Geysers: 3 |
| Music |
| Battlezone: |
| Battlezone: Rise of the Black Dogs: |
| Chronology |
|
Eagle's Nest One is the second mission of Stars and Stripes, and the last mission of Battlezone to be set on the moon. It is also the last mission in the Battlezone Demo. It shows the CCA's final assault on Eagle's Nest One, the event which forced the NSDF to retreat to Mars.
Details[]
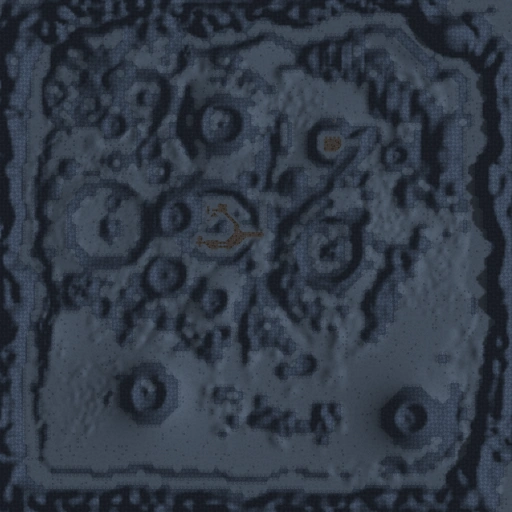
As the title implies this mission takes place within the boundaries of Eagle's Nest One, an NSDF base built on the site of a former training ground. The crater walls make the base difficult to defend from within, but the surrounding ridge does provide a good defensive position.
Synopsis[]

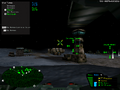
With no time even to bury the dead, the NSDF is immediately on the defensive. Bates is deployed to Eagle's Nest One just after the Soviet attack was repelled. General Collins informs him that the base survived, but was rendered defenseless - and a second attack from the south-east, aiming to destroy the Command Tower and Solar Arrays, is already underway. With no other combat units nearby Bates is forced to fight them off alone, after which the Montana is deployed in order to help restart the base's defenses.


The first wave of assailants
Bates gets only a few minutes to set up a defense before the Soviets attack the Command Tower again, but this time the base's defenses are adequate to beat them back. Minutes later a second wave is similarly fought off.
Shortly after the second attack, Collins informs Bates of a group of reinforcements returning from Outpost Two and asks him to rendezvous with them at the Solar Array to the north of the base. These reinforcements prove instrumental in fighting off the third attack, which appears shortly after their arrival.


Moving out
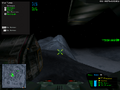
After the third attack is fought off the Soviets launch a much greater attack, landing a massive assault force of Czars and Flankers, backed up by a Recycler and Factory, to the north-west. Realising that this force is too strong for the limited forces to fight off, Collins orders the evacuation of the base; its key personnell move to two Transports which Bates is ordered to escort to the Launch Pad to the north-east.
Reaching the transports allows the NSDF to complete its evacuation of the moon; Collins declares that the NSDF will move to Mars in the effort to get ahead of the CCA. Eagle's Nest One - and with it, the moon - is lost to the Soviets.
Walkthrough[]


Of the three geysers, this one is most defensible
Once the mission starts head immediately to the ridge south of the Command Tower; two Flankers are approaching on an attack run and you'll need to dispose of them. When the first is destroyed, the second will retreat; chase it down or it'll come back to attack your transports later. Once that is done you'll want to deploy your Recycler; any of the three Geysers will do, but the front is the better tactical choice as it allows you to position your turrets more quickly and shields it a little more against the APC attack that's coming later. If you order your Recycler past the Geyser before you deploy it it will deploy with the bay facing south, which lessens the amount of micro-managing you will need to do. You may need to remind your Scavengers to gather resources. Keep building turrets as long as your resources allow; you can't have too many and unless your Scavengers die they're the only thing you'll need to build throughout the mission.
 In the Nintendo 64 version you will start with enough resources to build two Badgers instead of the usual one.


The four Paks will cause trouble later if not removed
You'll need at least one turret between the ridge and the command tower in order to draw fire and protect the tower. Fortunately you have more than ample time after the first attack wave and will be able to get two built by the time the first attack wave shows up. You may also wish to use this time to destroy the four Paks waiting in the crater to the east - they'll provide a nice scrap bonus and even if your Scavengers don't get snared by them they will only get in the way of your escort duties later. You can use your Manual Detonation Mortar to take them out from the other side of the hill - you only need three direct hits to take each out, but if you run low on ammo there's a Supply Depot just west of the Command Tower. If they manage to cause any significant damage, there's a Hangar just north of that.
After just over three minutes a second pair of Flankers will arrive. Depending on the difficulty your turrets may be able to deal with the Flankers just fine, but you will probably want to fight with them if you only have one or want to make sure. If any get seriously damaged or start to run out of ammunition (though the latter is unlikely), you can move them over to the Hangar or Supply Depot too.
Two minutes later the third attack wave will arrive (again, two Flankers), and by this time you should have four turrets in the field. Your Scavengers will need to start venturing further out into the field at this point unless you took some losses, so be prepared to keep an eye on them. Losing one will have a knock-on effect on your turret production.
After another two minutes you'll be informed of reinforcements arriving from the north - a Grizzly and a Razor. You don't particularly need to do anything about this, just be aware of it; the fourth attack wave, consisting of a Flanker, Czar and APC arrives shortly after. The Czar will run straight into your turrets on its way to the Solar Power Plants, but the APC will head for your Recycler - positioning it near the front of the base near your other charges means it's covered by the same group of turrets - and the Flanker will head for your Scavengers. The reinforcements (a Grizzly and Razor) will deal with it.


The insurmountable Soviet strike force
A minute after this attack you'll be informed that the CCA forces en route are too great for you to hold back and you'll be given a pair of APCs to escort. With the Paks already taken out you can just order them straight to the Launch Pad. The messages about scouting ahead for blockades refers to the Paks you took out earlier which would have moved to block the route, and since there are two Czars and a Flanker approaching from the rear you and your other offensive forces would be better dealing with that.
Once the transports arrive at the Launch Pad safely you'll be ordered to head there too; there will be a column of five Czars approaching Eagle's Nest One by this point but since you only have two minutes you are better leaving them alone and heading straight to your objective. Once you get within 100 meters you'll be rewarded with the mission completion cinematic.
Trivia[]

The lone Soviet barracks
- A CCA Barracks is placed in the map's south-eastern corner. Its only purpose is to prevent ejected Soviet pilots from standing idly.
- In Battlezone: Rise of the Black Dogs downed pilots will not return to it, despite its presence.
- The massive CCA assault force Collins describes as attacking from the north-west is actually spawned to the south in the cutscene. The waves of Czars and Flankers that attack the transports also come from this direction.
- In contrast to the general standard, losing the Recycler during this mission does not automatically result in a mission failure.
Gallery[]
")
")
")
")
")
")
")
")
Map[]
Appearances[]
| Stars and Stripes | ||
|---|---|---|
| Red Arrival · Eagle's Nest 1 · The Relic Discovered · An Unexpected Connection · Escape from Mars · Behind Enemy Lines · A Nasty Surprise · Wrangling the Fleeing Herd · The Race Is On · Bring It Home · Flying Solo · Total Destruction · The Three Beacons · United We Fight - United We Die · Strike At The Heart · Tapping The Core · The Ultimate Quake | ||